Repurposing an old tablet with LineageOS and Home Assistant
My house is set up with Home Assistant, an open-source smart home/home automation software. For a year or so I've been switching out light switches, plugs, and other items around the house to expand what I can do with it.
I had an old Samsung Galaxy tablet (circa 2013!) laying around that was too old to do much with and definitely not getting android updates anymore. I decided to try to repurpose it for use as a wall-mounted Home Assistant dashboard, which required flashing it with LineageOS to replace the existing Android software. Here are some notes on that process!

Tools used
I downloaded LineageOS and TWRP to my computer so that I could get them onto the tablet. I also installed adb and Heimdall on my mac to facilitate file transfer & flashing.
-
LineageOS: open-source operating system based on Android
- provides updates for many devices long after Android itself has stopped supporting them
- LineageOS is often used along with a Google apps package to get the basic applications that come pre-installed on most Android devices
- I opted not to install these, since they weren't necessary for my use case and it felt simpler & more secure without.
- The LineageOS website didn't have an official version listed for my very old tablet, so I used this "unofficial" LineageOS 14.1 found in XDA forums here.
-
TWRP (Team Win Recovery Project): Recovery mode for Android devices; replaces the default recovery mode with one with additional abilities, including flashing a custom OS.
- image I used: twrp-3.3.1.2-santos10wifi.img
-
adb(Android Debug Bridge): Debugging tool for Android devices (installed on computer)- lets you connect device to PC via USB and use the command line to do stuff on the device.
- LineageOS Wiki: ADB Fastboot Guide - instructions here for installing adb on macOS (with homebrew) or others
-
Heimdall - tool for flashing firmware onto Samsung devices - install on computer
- I used this MacOS Arm64 version but had to go through some struggling with my Mac to allow it to run.
- I didn't end up using the "frontend" part of this download, just used the executable which after downloading the release is in
heimdall-frontend.app/Contents/MacOS
Steps
- enable USB debugging on the tablet: enable developer options by going to settings → about and tapping build number 7 times
- Then under developer options, toggle USB debugging.
- connect tablet to Mac via USB
- Not all USB cables worked here, something to do with the type of data transfer they support. My partner happened to have bought one recently to use with an old Kindle, which worked for me.
- once connected, open terminal and type
adb devices- A dialog shows up on the tablet at this point, tap "ok" and "always allow" to avoid having to do this every time.
adb shell- poke around a bit and examine the file structure- copy downloaded LineageOS over to the tablet's SD card:
adb push ~/path/to/your/file/lineage-14.1-20240311-UNOFFICIAL-santos10wifi.zip /sdcard- (I knew
/sdcardwas a directory on the tablet from poking around withadb shellearlier)
- turn off tablet, restart it in download mode by pressing volume down + power button
- when warning screen appears, follow directions to continue (volume up button)
- used Heimdall to flash twrp to the tablet with this command:
heimdall-frontend.app/Contents/MacOS/heimdall flash --RECOVERY ./twrp-3.3.1-2-santos10wifi.img- optionally add
--no-rebootat the end
- optionally add
- then reboot tablet in recovery mode: volume up + home + power
- a bit of struggle to do this without first somehow resetting back to the system's default recovery mode
- if you don't reboot into recovery IMMEDIATELY, TWRP will be overwritten and reset back to the default recovery mode. So that happened about a zillion times, I kept getting the default recovery screen and having to go back and start over.
- eventually I think what worked was to run the Heimdall command without the
--no-rebootoption. Then basically pressing the buttons for recovery mode right away basically as soon as I ran that command.
- a bit of struggle to do this without first somehow resetting back to the system's default recovery mode
- Once I finally had TWRP working, I roughly followed the instructions on this YouTube video: (How to install Android 7 on Samsung Galaxy Tab 3), starting around minute 5, to wipe partition data and flash LineageOS
- in TWRP press wipe then advanced wipe
- under select partitions to wipe check the first 4 boxes (Dalvik / ART cache, System, Cache, and Data)
- still in TWRP, tap install and navigate to the LineageOS file copied earlier. Select and swipe right to go ahead and install it.
- in TWRP press wipe then advanced wipe
- After installation, use TWRP button that shows up to reboot the system. This took several minutes the first time but it worked!
Home Assistant Tools/Setup
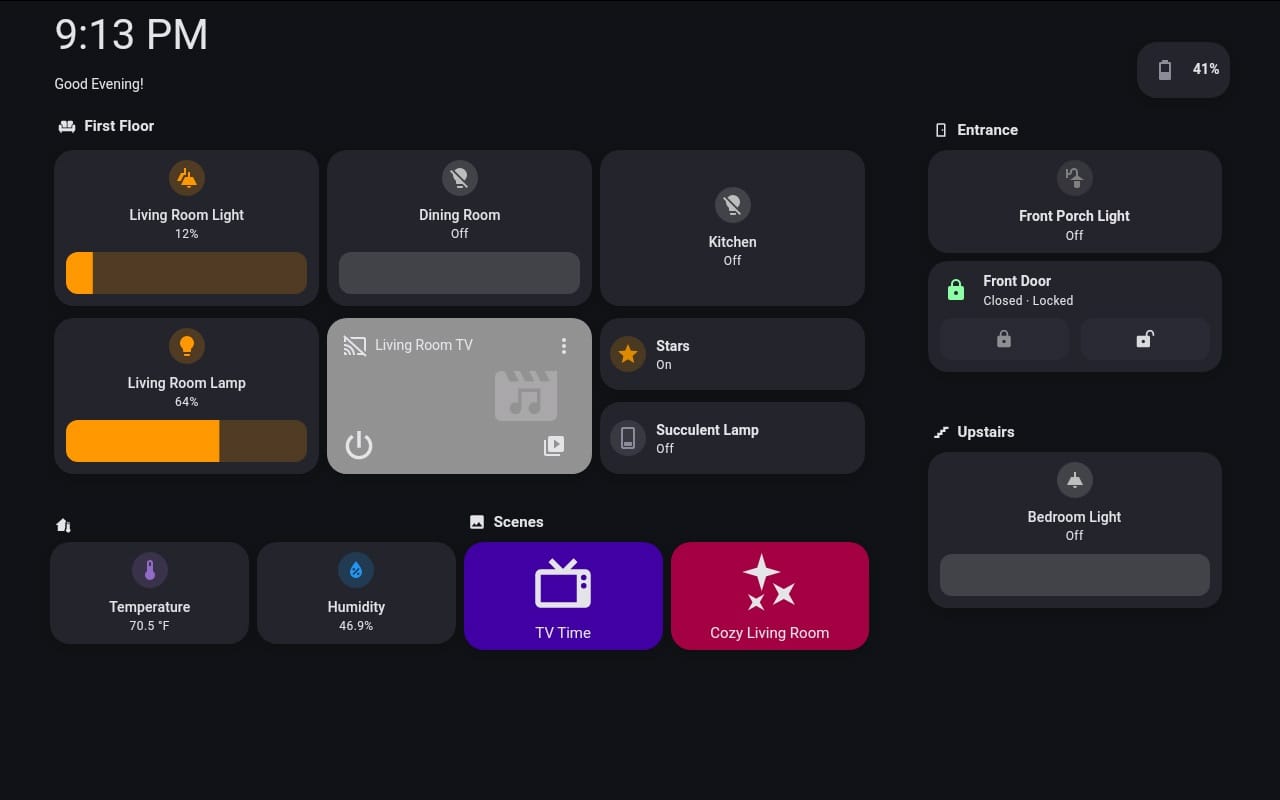
- I'm using this Fully Kiosk app to lock the tablet to the URL of the dashboard I built for it.
- Note on installation: To install an app without google apps / playstore set up, need to configure LineageOS settings to allow packages from unknown sources: Security → Unknown sources. Then download apk file.
- The app can use the device's camera to detect motion, so I've configured it to turn the tablet screen on only when motion is detected.
- Fully Kiosk Home Assistant add-on uses remote administration to expose the device and several properties & actions in Home Assistant directly. A paid license for Fully Kiosk is required to use this, around $10, (though Fully also lets you test it for free).
- I'm also using the kiosk-mode plugin (not related to Fully Kiosk app, just named similarly), which hides the Home Assistant header and sidebar drawer.
- I mounted the tablet on the wall, with charging cord attached, with some cheap wall mounts from Amazon.
- The charging cord is plugged into an MQTT smart plug, and I set up an automation to turn the charger on when the battery gets below 20%, and off when it gets back to full.